
In digital advertising, tracking conversions is the cornerstone of success. Understanding how your Google Ads campaigns perform hinges on your ability to measure conversions effectively. At the heart of this process lies the elusive Google Ads conversion ID. In this comprehensive, we’ll walk you through the steps to find your conversion ID precisely and clearly. From navigating your Google Ads account to leveraging Google Tag Manager, we’ll equip you with the tools and knowledge you need to unlock the full potential of your advertising endeavors.
Why is Finding the Conversion ID Important?
Before delving into the nitty-gritty of locating your Google Ads conversion ID, let’s underscore the importance of this seemingly innocuous string of numbers and letters. In the intricate web of online advertising, every click, sign-up, or purchase holds invaluable insights into the effectiveness of your marketing efforts. Conversion is the linchpin in this process, enabling you to bridge the gap between ad spending and tangible results. By accurately tracking conversions in Google Ads, you gain invaluable data to refine your targeting, optimize your ad spend, and ultimately drive more significant ROI. In essence, finding your conversion ID is akin to unlocking the door to a treasure trove of actionable insights that can propel your Google Ads campaigns to new heights of success.
Read also about Google Ads conversion rates.
How to find the Conversion ID within Google Ads
To uncover the Conversion ID within Google Ads, follow these step-by-step instructions tailored to empower even the most novice users:
- Step 1: Access Your Google Ads Account
Begin by logging into your Google Ads account. Navigate to the dashboard where your campaigns are managed.
- Step 2: Navigate to Tools & Settings
Look for the Tools & Settings icon in the upper-right corner of your account dashboard. Click on it to reveal a dropdown menu of options.
- Step 3: Locate the Conversion Section
Within the Tools & Settings menu, scroll down until you find the “Measurement” section. Click on “Conversions” to proceed.
- Step 4: Initiate a New Conversion
Once in the Conversions section, you’ll encounter a button labeled “+New.” Click on this button to initiate the creation of a new conversion action.
- Step 5: Specify the Conversion Type
Choose the type of conversion you wish to track. For instance, select the corresponding option if you’re tracking website conversions.
- Step 6: Define Conversion Details
You’ll be prompted to provide specific details about the conversion action you’re tracking. This includes assigning a category, such as “Purchase,” and entering the URL of the corresponding thank-you page.
- Step 7: Proceed to Tag Setup
After defining the conversion details, proceed to the next step by clicking “Create and continue.” This will lead you to the tag setup phase.
- Step 8: Access the Google Tag Manager Tab
Even if you’re not actively using Google Tag Manager on your site, select the options to proceed to the Google Tag Manager tab.
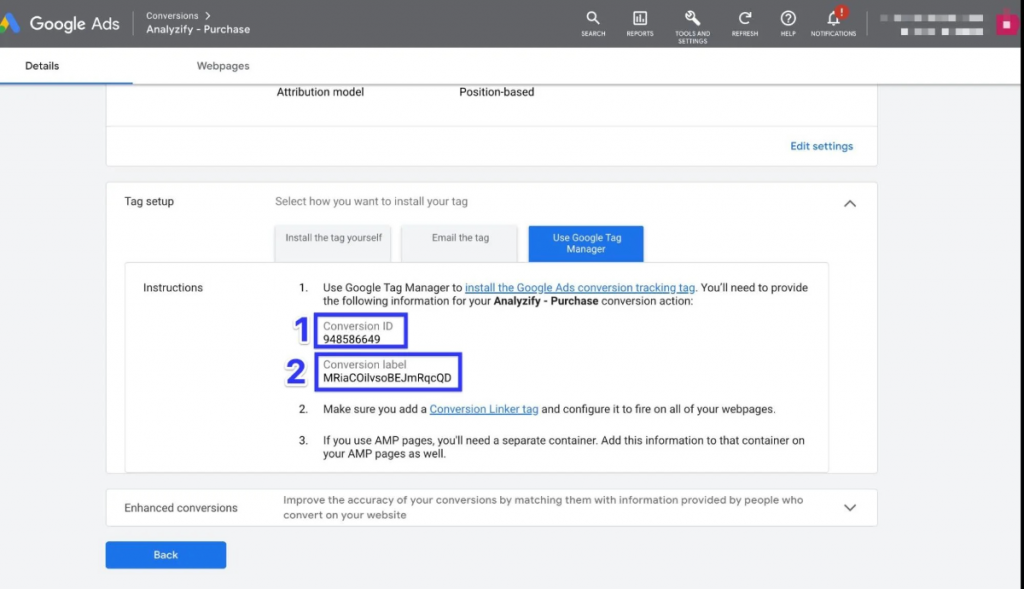
- Step 9: Copy the Conversion ID
You’ll find the Conversion ID prominently displayed within the Google Tag Manager tab. Copy this unique identifier to your clipboard.
- Step 10: Finalize Setup
Click “Next” and then “Done” to complete the setup process within Google Ads. Paste the copied Conversion ID into the relevant field in your website’s admin panel or tracking settings.
By diligently following these straightforward steps, you’ll successfully unearth the Conversion ID within Google Ads, empowering you to track and analyze the performance of your advertising campaigns with precision and efficiency.
Advanced Techniques for Enhancing Your Google Ads Conversion Tracking

In today’s digital marketing landscape, mastering Google Ads conversion tracking is beneficial and essential for campaign success. Whether you’re a seasoned marketer or a business owner venturing into the digital space, understanding the nuances of conversion tracking can significantly impact your return on investment (ROI). Let’s dive deep into advanced techniques for setting up and optimizing your Google Ads conversion tracking, ensuring every click counts and contributes to your business goals.
The Crucial Role of Conversion ID and Label in Tracking
The conversion ID and label are at the heart of Google Ads conversion tracking. These elements are pivotal in tracking visitors’ actions on your website, from filling out a form to completing a purchase.
- Sign in to your Google Ads account.
- Click on the “Tools & Settings” icon in the upper right corner of the page.
- Under the “Measurement” section, select “Conversions.”
- You’ll see a list of your conversion actions, along with their respective conversion IDs.
Remember, the conversion ID is a label that can uniquely identify each action, enabling Google Ads to match conversion data with the specific interactions on your site.
Integrating with Google Analytics
For a more granular analysis of your conversion data, integrating Google Ads with Google Analytics is a game-changer. This integration allows you to use the conversion tracking tag from Google Ads and the global site tag or Google Tag Manager to track conversions. The event snippet, a piece of code added to the thank you or confirmation page captures the conversion action as it happens. This synergy between Google Ads and Google Analytics offers a comprehensive view of your customer’s journey, from initial click to conversion. Here’s how to do it:
- Sign in to your Google Analytics account.
- Go to Admin and select the correct property.
- Click on Google Ads Linking.
- Click + New link group.
- Choose the appropriate Google Ads account.
- Click Continue.
- Add a group title and turn on linking.
- Ensure that auto tagging is enabled.
Optimizing Conversion Actions and Values
Each conversion action on your site, whether an app download, a signup, or a purchase, holds different values for your business. Manually setting and updating the conversion value helps attribute the correct importance of each action. Additionally, selecting the appropriate conversion window and attribution model in your Google Ad settings can significantly influence how conversions are counted and attributed to your ads. For instance, a longer conversion window may benefit products with a longer decision-making process.
Leveraging Google Tag Manager
Google Tag Manager (GTM) simplifies installing various tracking tags on your website without needing to edit site code directly. Using GTM to deploy the conversion tracking tag and conversion tag, you can efficiently manage all your tracking codes in one place. GTM’s interface allows you to define triggers that specify when the tags should fire, such as when a user reaches a thank you page after completing a purchase. This level of control ensures accurate tracking of all conversion actions across your site. Here’s how to do it:
- Sign in to your Google Analytics account.
- Go to Admin and select the correct property.
- Click on Google Ads Linking.
- Click + New link group.
- Choose the appropriate Google Ads account.
- Click Continue.
- Add a group title and turn on linking.
- Ensure that auto tagging is enabled.
Additionally, to set up conversion tracking using Google Tag Manager, consider the following steps:
- Create a new tag in GTM.
- Choose Google Ads Conversion Tracking as the tag type.
- Enter the Conversion ID and Conversion Label provided by Google Ads.
- Select Unrepeatable to ensure accurate tracking.
- Click Continue to complete the setup
Troubleshooting and Testing Your Setup
Even with a meticulous setup, verifying that your conversion tracking is functioning correctly is crucial. Tools like Google’s Tag Assistant can help you test and validate the implementation of your global site tag and event snippets. Additionally, conducting regular audits of your conversion tracking setup in Google Ads and Google Analytics ensures that every conversion is accounted for.
Regular Maintenance
The digital landscape is ever-changing, and so are your business objectives. Regularly reviewing your conversion tracking setup, including checking the conversion label and ID, updating conversion values, and ensuring the tracking code is correctly installed across new pages, is essential. This proactive approach helps capture all valuable customer actions and provides you with accurate data to inform your campaign optimizations.
Advanced Google Ads conversion tracking techniques offer a pathway to understanding your campaigns’ effectiveness and optimizing them for better performance. You can unlock valuable insights into your advertising efforts by paying close attention to the setup and maintenance of conversion IDs and labels, integrating with Google Analytics, and leveraging tools like Google Tag Manager. Remember, knowledge is power in the realm of Google Ads, and conversion tracking is the key to unlocking that power.
Conclusion
Mastering the process of finding the Google conversion ID is crucial for effective Google Ads conversion tracking, as businesses can make informed decisions to optimize their advertising efforts and maximize their return on investment. By following the steps outlined in this article and paying attention to details such as the ID and conversion label, advertisers can ensure that their conversion tracking is set up correctly and provides valuable data for campaign analysis and optimization. So, don’t forget that this step is fundamental to unlocking the full potential of your advertising campaigns.

A PPC specialist who started with organic social media. For several years, the core of his activities are:- Google Ads, Microsoft Ads, Meta Ads, TikTok Ads, Twitter Ads, Linkedin Ads. He has led campaigns with a global reach, e.g. for FootballTeam, G2A, ETOTO, as well as many smaller campaigns in the sports, construction and financial industries. Has full focus on ROAS. Privately, a fan of football, history of wars and Star Wars.