Let’s immerse ourselves in the secrets of Shopify and Google Ads and how both platforms can work together to pull off the best of products and ads through the right conversion tracking setup.
In the subsequent lines, you’ll learn how to set up Google Ads conversion tracking in Shopify in the easiest way possible to get the results you expect from your online store.
This article is a segment of a more extensive piece about How to Setup Conversion Tracking in Google Ads.
- What Is Google Ads?
- What Is Shopify?
- What Is Google Ads Conversion Tracking?
- What Does Introducing Google Ads Conversion Tracking on Shopify Involve?
- How to Set Up Google Ads Conversion Tracking Shopify
- Test Your Google Ads Conversion Tracking
- What Are the Most Common Mistakes Related to Conversion Tracking
- Google Ads Campaigns Best Practices Using the Data of Google Conversions
- Wrapping It Up
What Is Google Ads?
We’ll briefly answer the question “What is Google Ads?” since we’ll focus on how to link Shopify to Google Ads for conversion tracking. To summarize, Google Ads is the bid-based online advertising platform of the American giant that allows retailers, marketers, sellers, and others to deploy advertisements across different media, including the Google Search Network.
What Is Shopify?
Source: Yaguara.
Shopify is an ecommerce platform where everybody can start, run, grow, manage, and scale a business mostly focused on selling products and services. Shopify lets interested ones build an online store, entice customers, and receive payments from different channels and locations.
What Is Google Ads Conversion Tracking?
Google Ads conversion tracking lets you monitor the actions taken by visitors to your site after they click on your ads.
For example, thanks to Google Ads conversion tracking, you can get the data about which product gets the most conversions on your Shopify store or which ad of your Google Ads campaign generates the most conversions or sales.
What Does Introducing Google Ads Conversion Tracking on Shopify Involve?
Linking Google Ads and Shopify has great benefits for your online store. Let’s check three of the most important ones.
- Google provides you with a Google Ads conversion code, better known as Conversion Tracking Tag, that you can add to Shopify to track a particular action within the website.
- When a visitor or a potential customer takes an action, the specific data will be sent to your Google Ads account by reflecting the amount of the action and the money generated from it.
- With this data in your hand, you can make better decisions about what products are the best-selling products in Shopify and evaluate changes and improvements regarding marketing, etc.
How to Set Up Google Ads Conversion Tracking Shopify
Currently, there are two ways of linking your Google Ads conversion tracking to your Shopify site. First, you can utilize the Google and YouTube app. Using the second, you insert the provided code directly into the Shopify website manually. Below, we delve into the two ways. This way, you can choose the option that is more convenient for you.
Adding Conversion Tracking on Shopify by Using Google & YouTube App
Before embarking on this first method, you must have a Google Merchant account. Having and working with this platform will help you associate several services and platforms within and outside Google, facilitating the creation and publication of products. Beyond this, you should also fulfill some requirements that I have attached below.
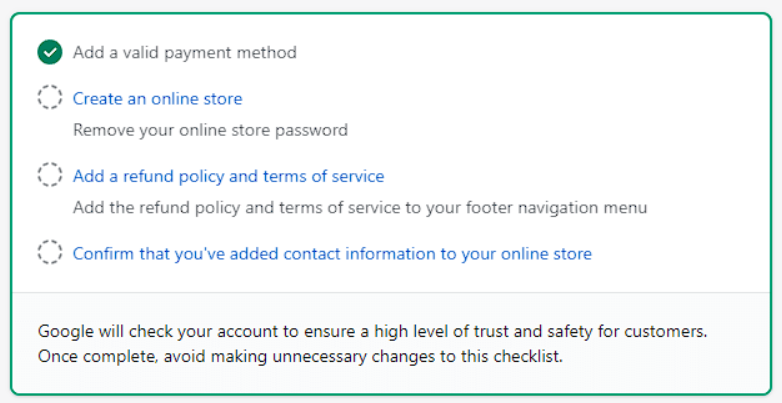
- It would help if you had a non-password-protected Shopify store.
- You need to set up a valid payment method within Shopify.
- You need to set up and add a Refund Policy and Terms of Services document in your footer navigation menu. You can do this in your setup checklist.
- You need to make your contact information visible to your customers. It means, at least one contact method, such as phone number, email address, and similar.
- Your products should be delivered to one of the supported countries and sold in an available currency in that country.
If you meet all these requirements, follow the steps below:
- Enter your Shopify account and go to the Google & YouTube app section. Once there, click the “Add app” button.
- In the next window, the system will prompt you to authorize the connection. To do this, click the “Add Sales Channel” button located in the top right.
- Next, link your Google account to Shopify by clicking the “Connect Google Account” button.
- In the window that pops up, select the Google account you want to link in case you have more than one account. If you haven’t completed the requirements mentioned in the first part of this section, here you’ll see a checkbox listing the specifications you need to meet.
- Next, you need to associate your Google Merchant account. Fortunately, if the Google account you linked in the step before is the email you used to create your GMA, then the system will automatically fill the box. Then, just click the “Connect” button to finalize the process.
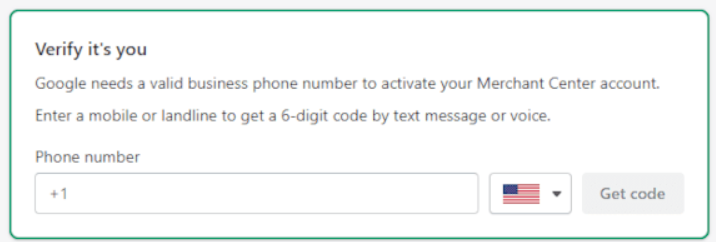
- In the following step, the system will prompt you to give it your phone number to verify your identity. Type your number and the code you’ll receive.
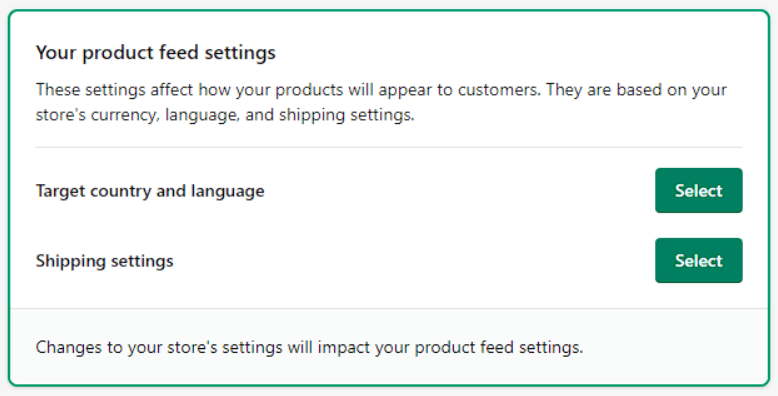
- Now, you need to add your products’ feed. This way, Google will know where exactly to display your products, either the Google Search Network, images, and more. So, add your shipping locations and settings.
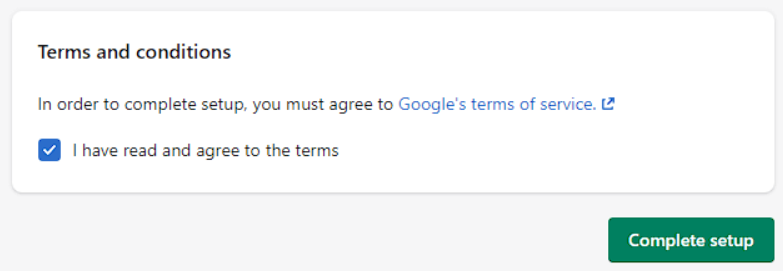
- As a last step, just check the box to accept the terms and conditions and finish the configuration. Click the “Complete setup” button.
Shopify and Google will take up to one hour to sync all your products to the Google Merchant Center. Once finished, your online store will be displayed on all the Google Ads platforms.
Adding Conversion Tracking on Shopify Manually
As we mentioned in the first part of this article, tracking Shopify and Google Ads conversions is crucial to carry out and manage an excellent online store. This second path can be a bit complicated for novices and neophytes, but still, it provides you with an alternative route if the previous methodology does not work.
In this second way, you’ll create the conversion action and install the global site tag to add the event snippet to the part you want to track.
- Create the Conversion Action in Your Google Ads Account
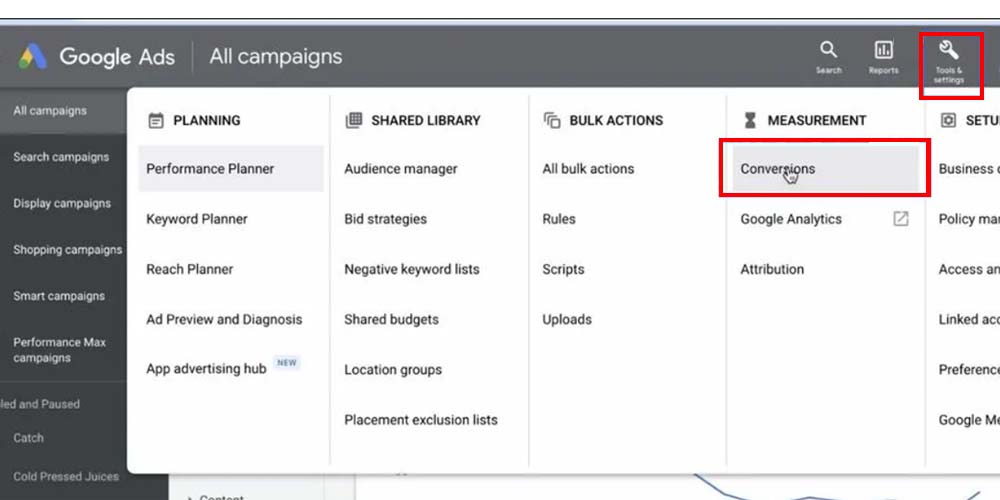
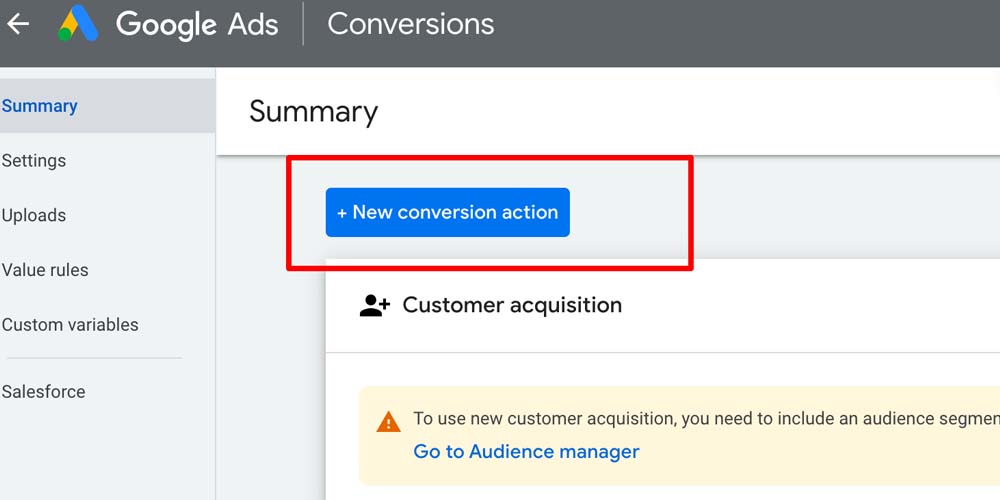
Log in to your Google Ads account and head to Tools & Settings. There, click on “Conversions” from the top menu. In the new windows, click the “+New Conversion Action” button to create the conversion action.
- Select the Proper Platform for the Event
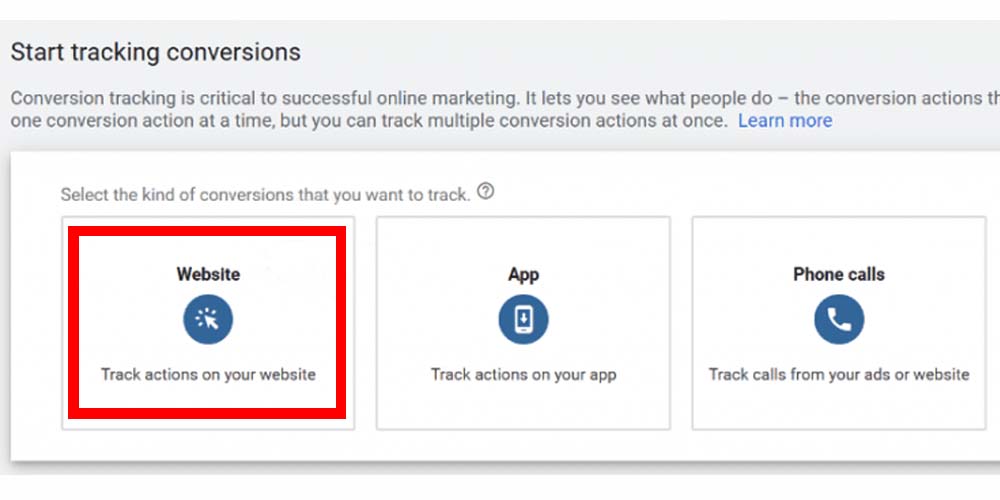
To start tracking conversions on a particular platform, you must select the source you want to track. In the next window, you’ll find four options: Website, App, Phone calls, and Import. In this section, you must select “Website.”
You should also select the conversion type. The options are Online Sales, Link Clicks, Page Views, and Sign-Ups. Once you’ve selected this option, Google Ads will prompt you to type the website URL you want to link. This way, Google can scan the site and verify if it has a Google tad code already.
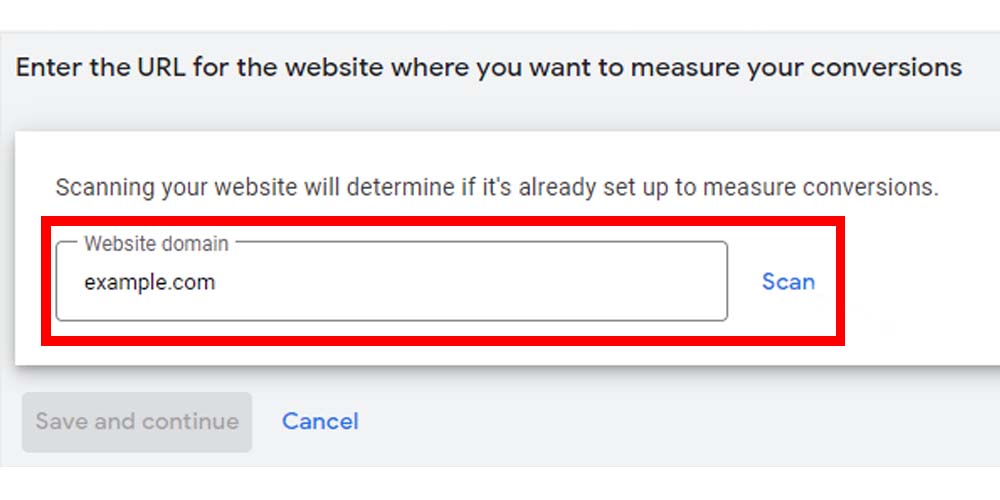
However, despite the fact that you can create a conversion action by using your website URL, it’s better if you do it manually. This way, you can control features better.
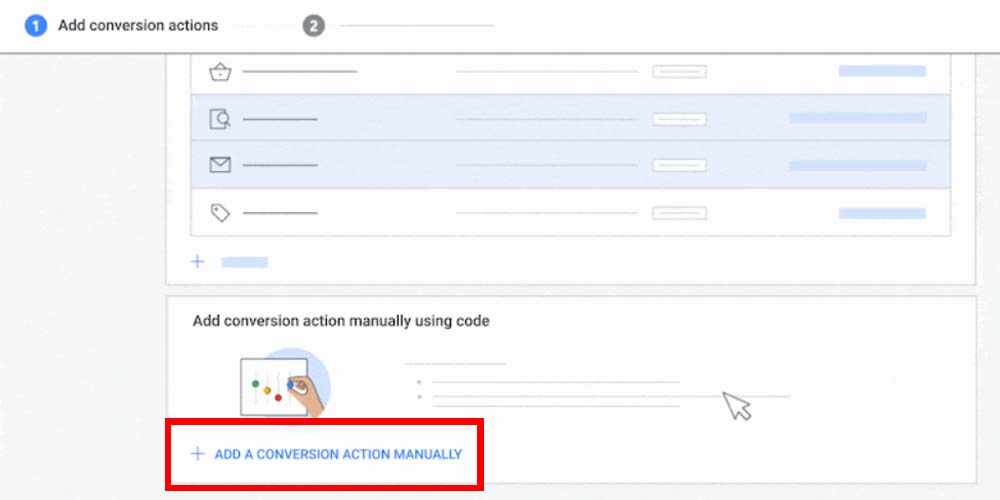
- Create Your Conversion Action Manually
To create your conversion action manually, scroll down at the bottom of the page and select the option “+Add a Conversion Action Manually.” In this option, you can insert transaction-specific values, IDs, and other customer parameters or measure clicks on links or buttons.
Now, head to the “Goal and action optimization” section and select the goal category that better fits your purpose. In this case, you should select “Purchase.” In the Conversion action optimization options you see below, you can determine if this is a primary action for reporting and bidding optimization or a secondary action for observation.
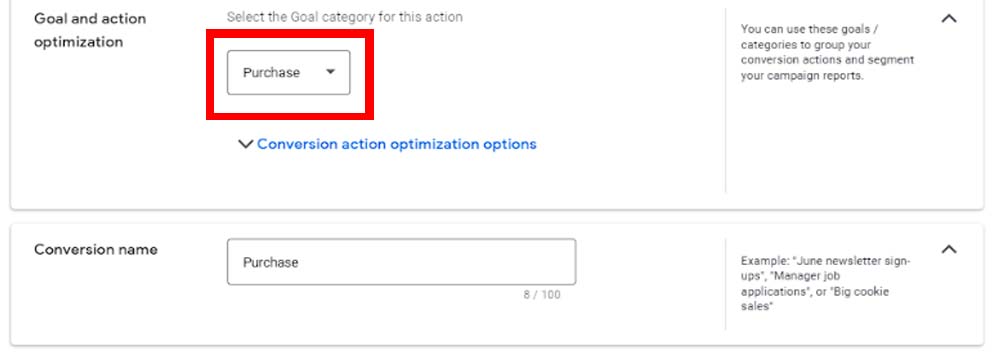
In the section below, type the conversion name of the conversion you want to track. For instance, you can type “Shopify purchases” or “newsletter sign up” or any other conversion on which you want to focus. This action will help you to identify the particular conversion tracking, especially if you have several Google Ads accounts.
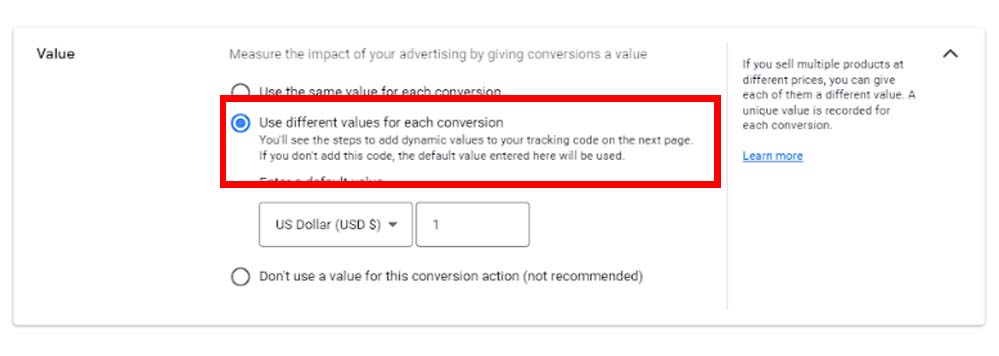
Go to the “Value” section to choose the right option when tracking the value of each conversion. Select the “Use different values for each conversion” option. This is the right choice when you sell several products at different prices (see the image above).
Moreover, when you add the conversion tracking tag later, you’ll need to customize it to track transaction-specific values.

Below, in the “Count” section, you can select how to count the conversions you’re tracking. The best option is “Every” since you can track each conversion separately, and every purchase is valuable. (Check the image above).
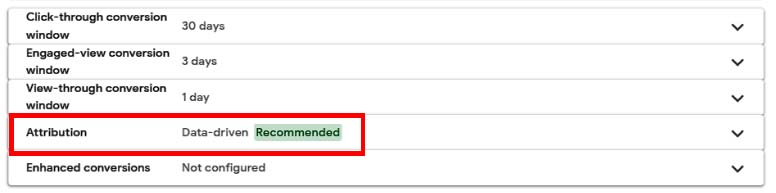
In the section below, you’ll be able to select how long to track click-through and engaged-view conversions. We recommend not exceeding 30 days of tracking. Finally, in the “Attribution Model,” you should select “Data-driven” since it will help you to understand how the ads perform and optimize the purchase conversion journey.
So, just click the “Create and Continue” button to save the operation. Now, you’ve created the conversion on Google Ads. Keep in mind that you can create as many conversion actions as you need.
Now, it’s time to set up your Google tag to add your event snippet. If you haven’t set up the Google tag yet, then you’ll receive instructions to add the tag and event snippet to the conversion action you’ve created.
- Add the Google Tag to Shopify
The fourth step when it comes to knowing how to setup conversion tracking in Google Ads is installing the Google tag on every page of the website, in this case, your Shopify store.
But what exactly does the Google Tag do?
In a simple sentence, and according to Google support, it uses click information to attribute a conversion to your Google Ads campaigns when the Google tag is linked to your Google Ads account. It also adds new cookies to the site and collects data about ads that brought visitors to the website.
Regarding setting up the Google tag, the best is to install it manually since it’s probably the first time you’re setting up the tag for a conversion action. To do this, pay attention to the last page of the setup. Here, select the “Install manually” option and copy the Google tag code you will see below. An example of how the code should look is:
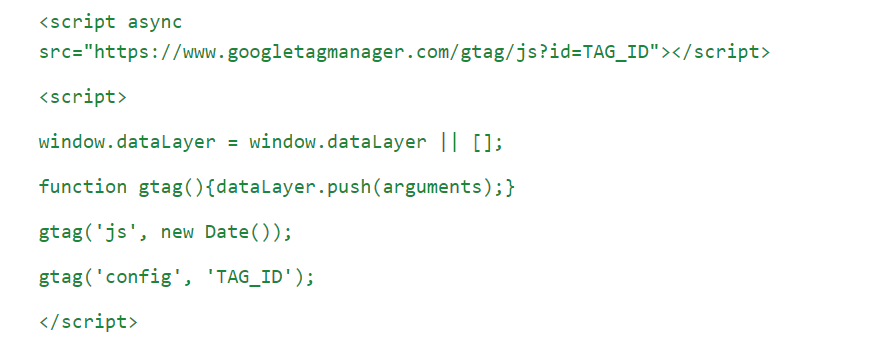
Now you have copied this Google tag code, you should add it to your website. To do this, open a new browser window and open the Shopify admin. Once there, click the “Online Store” button, as you can see in the image below.
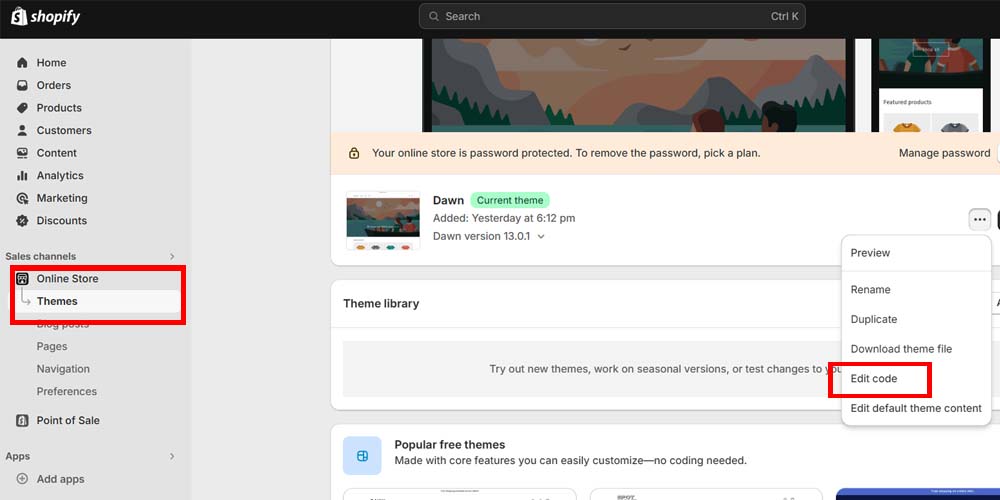
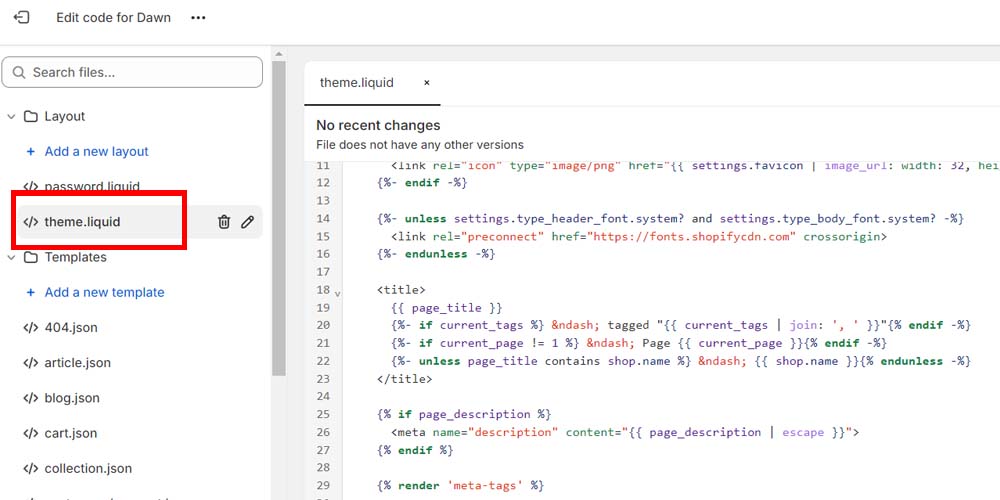
In the new menu, select theme.liquid to open the HTML section. To apply the Google tag to every page of the store, paste the tag between the <head> and </head> tags. Click the save button.
Once this process is finished, it’s time for the last part of the process, which is installing the event snippet to Shopify.
But before this, let’s explain another methodology for setting up the Google tag.
Setting Up the Google Tag by Using the Google Tag Manager (An Alternative Way)
Tag Manager is a management tool that facilitates the usage of every enhanced conversion code and updates tags and event snippets on your site. You can use this tool to install your Google and conversion tracking tags. To create your Google tag in Tag Manager, follow these steps:
- Open Google Tag Manager.
- Open the Tags Menu to select the container you want to set up.
- Create a new tag and name it.
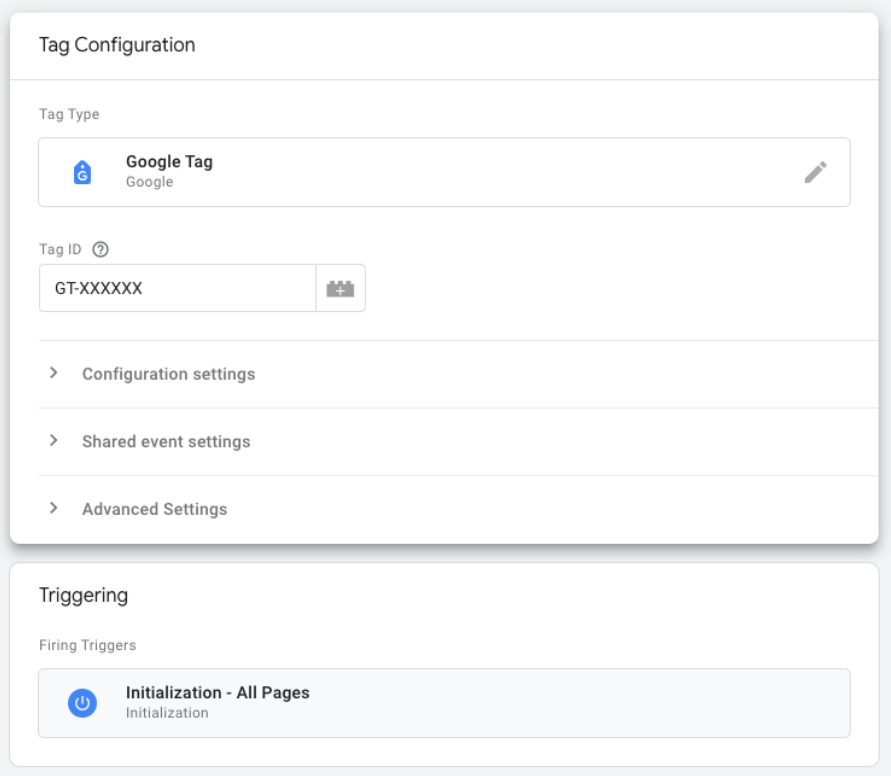
- Select a Google tag in the Tag Configuration box.
- In the Tag ID field, enter your Google Tag ID. If you need to know how to find conversion ID Google Ads, you can do it inside the Google tag settings within Google Ads, Google Analytics, and Google Tag Manager. Log in and follow the instructions to view your tag ID. You also probably must use the conversion label, which you can find in the event snippet in the form of AW-CONVERSION_LABEL.
- Save your Google tag.
You also will need to create a trigger to ensure that your Google tag works before other triggers. To do it, follow these steps:
- Click the “Triggering” button.
- Use “Initialization” and “All pages trigger.”
- Name the tag and save the changes.
Note. If you also use WordPress and want to learn how to add conversion tracking code to WordPress, click the link before for more information.
Adding the Event Snippet to Shopify
This final step is to modify the snippet of code you get from Google. This way, you can insert it in the Additional Scripts box inside Shopify. So, come back to the conversion action you created in the step above and click the “Install event tag” button.
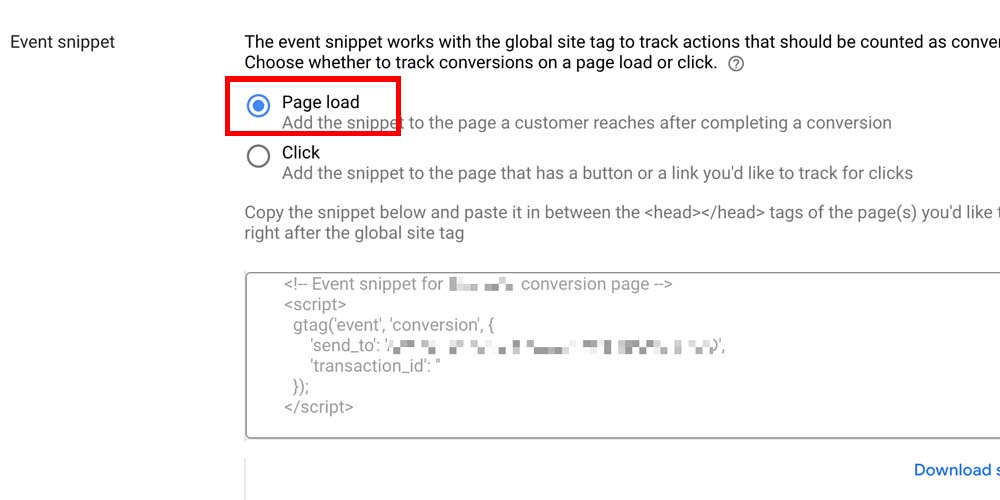
In the “Event Snippet” section, select the “Page load” option for counting conversions every time a customer visits the page and completes a conversion, such as a purchase or sign-up. After this, copy the snippet you see in the box below. Now, you must add the event snippet to the Shopify page.
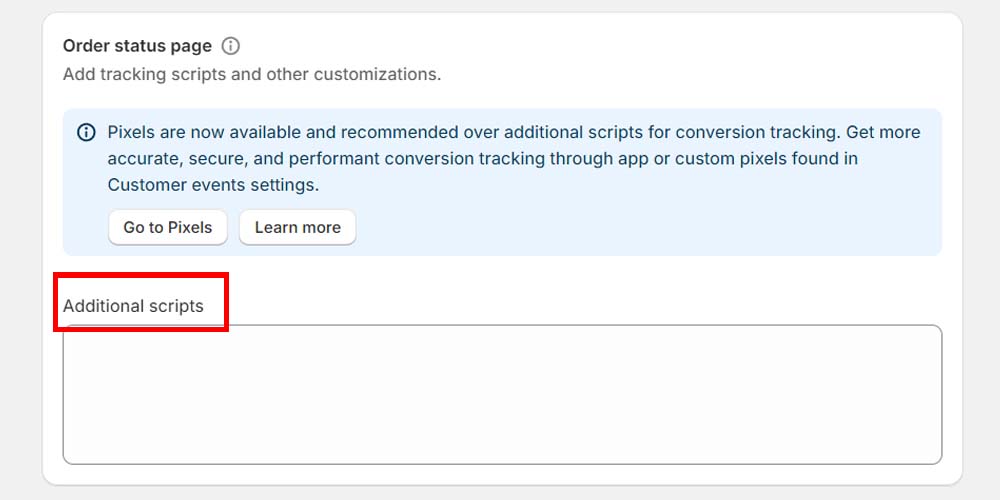
In another browser window, open the Shopify admin and heat to Settings > Checkout. Inside the checkout page, In the “Additional script” box, paste the snippet you previously copied. If there is already a code in the text box, add the snippet in a new line below the existing code. (See the image below).
Now, here comes the delicate part. So, we’ll explain it via bullet points.
- Copy the global Google tag you utilize above and add it above the event snippet.
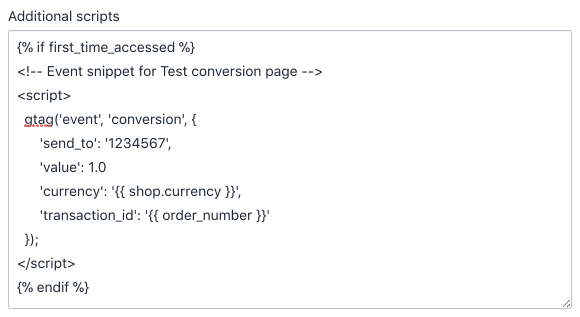
- Add tags before and after the snippet to prevent a duplicate conversion. To be more specific, paste the tag {% if first_time_accessed %} on the line before the snippet and the tag {% endif %} after the snippet.
- If you don’t sell in US dollars, replace the “USD” in the snippet with ‘{{ currency }}’.
- To prevent duplicate conversions, check the “transaction_id.” By default, this section is blank. Just replace it with ‘{{ order_number }}’.
- Click the save button.
- If you offer products with a different purchase value, then you need to replace the line that begins with ‘value’ with one of these alternatives.
- ‘value’: {{ checkout.subtotal_price | divided_by: 100.0 }}, if you want to exclude taxes and shipping.
- ‘value’: {{ checkout.total_price | divided_by: 100.0 }}, if you include taxes and shipping in the conversion amount.
If you did all correctly, then you should obtain an event snippet code as the following:
However, since conversions involve more than just purchasing a product, you will need to follow your steps and set up other conversions you’re interested in tracking, such as when potential customers add to a cart or subscribe to newsletters.
If you’re interested in knowing more about conversions, like, for example, what is cost per conversion, click the link before.
Note. Now, everything is ready to start tracking conversions on your Shopify page. Consider that the system may delay some hours since it needs to sync all the data you’ve provided.
Test Your Google Ads Conversion Tracking
The simplest way to test how your Google Ads conversion tracking is working is to buy one of your own products and check if the data appears in the Google Ads Manager. To do this, complete the purchasing process, head to the Manager, and choose the conversion option under the Measurement tab. In this section, you should see the status as active and the total number of conversions that the product has until that moment.
What Are the Most Common Mistakes Related to Conversion Tracking
After copying and pasting the conversion tracking code, your conversion configuration may present some problems. The three most common mistakes are the following.
Delay in Conversion Data Reports
Since your Google Ads account and Shopify will share a lot of data from your post-purchase page, a delay in your conversion reporting likely exists. But do not worry, this is normal! Regular and enhanced conversions take a while to process. If you notice that the data does not appear after 24 hours, then use Google’s Tag Assistant tool to troubleshoot the connection between both platforms.
Not Seeing the Proper Conversion Data
The simplest way to check if the conversion data is correct or not is to use the Google Tag Assistant tool. So, you need to connect the Google Tag Assistant to your website. Once here, just repeat the action you’re trying to measure. If everything goes okay, you should be able to see the data you want.
Wrong Conversion Values
If you notice some problems related to values, such as values off, you should check the code. It’s because you’ve installed it manually. If this happens, check the currency section of the code that we explained above. Remember, you can set it manually and replace the USD if you need it by using the currency placeholder ‘{{ currency }}’.
If you do not know what conversion value Google Ads is, click the link and learn everything about this relevant concept.
Google Ads Campaigns Best Practices Using the Data of Google Conversions
To finish this article, let’s take a look at some tips you should implement for better conversion performance.
- Analyzing Tracking Conversions on Google Ads for Profound Data
No matter which conversion page you’re analyzing, you should consider all conversion and customer data you receive in your conversion action summary. Here, you can check the conversion value, the average viewable CPM, the conversion rate, and more. Checking the campaign performance will allow you to enable enhanced conversions and understand which products are working and which are not.

Collaborating with a dedicated marketing agency like GamerSEO providing Google Ads management services can elevate your business above your competitors. By leveraging expert expertise and strategic approach, you can effectively address challenges and achieve optimal results, including improved advertisement performance and higher conversion rates.
If you’re unsure whether your conversion rate meets expectations, our article on determining a “good” conversion rate can provide valuable insights. If you discover your conversion rate falls short, GamerSEO offers personalized solutions to address and improve performance. With our individualized approach, we’ll work together to tackle any challenges and optimize your results.
- Identifying Best Keywords and Pieces of Content
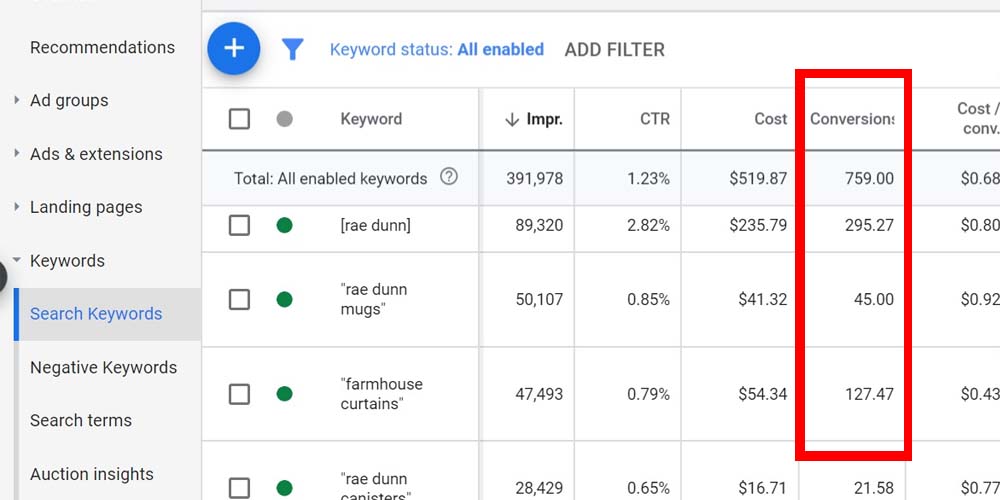
Once you know what products or ads are working better, you can identify the highest-performing keywords and ad text. How can you do this?
Head to the “Keywords” tab in the ad group or campaign. Once here, see the “Conversions” column to check which keywords are performing the highest conversions. These keywords are likely driving you the best profits or expected actions.
- Adjusting the Budgets and Bids According to Data
Just like what happens when you use the average click-through rate, the ROAS, or any other data to improve marketing strategies, you can use the data you get from conversion-tracking sales to make some changes and improve the strategy.
At this point, the most important thing is to adjust budgets, bids, and even the texts you use when building your product feed on Shopify. Probably, if your product does not accurately convert, you should change one of its aspects, like text and budget.
Wrapping It Up
Tracking all the conversions your website performs is crucial to be aware of how your website, ads, sales, and other elements are working. This is even more important when it comes to ad campaigns and online stores, such as Shopify.
The info you read above will help you with the Google tag setup to track conversions from your Shopify site. Whether you add the tag manually or use the URL, all this data will facilitate your access to conversion tracking and enhanced conversion setup.

A PPC specialist who started with organic social media. For several years, the core of his activities are:- Google Ads, Microsoft Ads, Meta Ads, TikTok Ads, Twitter Ads, Linkedin Ads. He has led campaigns with a global reach, e.g. for FootballTeam, G2A, ETOTO, as well as many smaller campaigns in the sports, construction and financial industries. Has full focus on ROAS. Privately, a fan of football, history of wars and Star Wars.