In the fast-paced world of e-commerce, staying ahead requires more than just an appealing online storefront. To thrive, you need insights into customer behavior, effective ad campaigns, and revenue-boosting strategies. That’s where the Meta Pixel (formerly Facebook Pixel) comes into play. This seemingly inconspicuous piece of code offers Shopify store owners many opportunities, from tracking visitor actions to fine-tuning ad targeting. In this comprehensive guide, we’ll take you on a journey to unlock the potential of Meta Pixel and add it to your Shopify store, ensuring you’re equipped to supercharge your e-commerce success.
What is Meta Pixel? Unveiling the Powerhouse of E-commerce Insights
Understanding your customers’ behavior and preferences is akin to having a treasure map. In the modern age of online shopping, the Meta Pixel is the compass that guides you through the labyrinth of data, helping you unearth invaluable insights and drive success.
Breaking Down the Meta Pixel
At its core, the Meta Pixel is a small piece of code, a digital Sherlock Holmes of sorts, that you add to your Shopify store. This unassuming line of code, when expertly incorporated, becomes your silent partner, working diligently in the background to monitor and record visitor actions and events on your website.
How Does Meta Pixel Work?
Once you’ve equipped your Shopify store with the Meta Pixel, it works with admirable stealth. It keeps a meticulous record of every click, every page view, and every product added to the cart. But the real magic happens when this data is sent back to Facebook, where it’s processed and stored for your benefit in Facebook Ads Manager.
Why Does Your Shopify Store Need Meta Pixel?
Now, you might wonder: Why go through all this trouble? The answer is simple, powerful insights. Meta Pixel isn’t just an observer; it’s your key to understanding customer behavior, measuring the success of your advertising campaigns, and optimizing your ad targeting. Here are some compelling reasons why your Shopify store needs the Meta Pixel:
Optimize Tracking and Ad Performance: After a visitor clicks on a Facebook ad and lands on your Shopify store, the Meta Pixel continues to monitor their actions. This data enables you to assess the effectiveness of your advertisements, showing which ads prompt desired actions and which require refinement.
Create Focused Customer Audiences: With the help of Meta Pixel, you can create lookalike audiences. For example, suppose you have a custom audience of customers who’ve purchased a specific product. In that case, you can use this data to create lookalike audiences with similar characteristics, expanding your reach to potential customers who are likely interested in your products.
Track Conversions More Accurately: Meta Pixel tracks and records user actions on your site after interacting with a Facebook ad, significantly improving conversion tracking for Shopify stores. This data helps you determine your return on ad spend (ROAS) and identify which ads lead to valuable actions, enabling you to refine your advertising strategy.
Recognize Consumer Behavior: Meta Pixel tracks how users interact with your Shopify store after viewing or clicking on a Facebook ad. For instance, it can track “View Content” events when a user views a specific item or page on your website. This information can help you identify potential issues with your product pricing or descriptions.
In this digital age, success in e-commerce hinges on understanding your customers, optimizing your marketing strategy, and delivering a personalized shopping experience. Meta Pixel paves the way for all these achievements, making it an indispensable tool for Shopify store owners.
Now that we’ve shed light on what Meta Pixel is and why it’s crucial for your Shopify store, let’s dive into the step-by-step process of adding this game-changing tool to your online retail arsenal.
How to Add Meta Pixel to Shopify
Success is closely tied to your ability to leverage data and analytics. One powerful tool for Shopify store owners is the Meta Pixel, formerly the Facebook Pixel. This code snippet, when integrated into your online store, opens a world of possibilities for tracking customer behavior, optimizing ad campaigns, and enhancing ad targeting. Let’s explore how to add Facebook Pixel code on the Shopify store, ensuring you make the most of this invaluable resource.
Assemble Your Facebook Assets
The journey to implementing Meta Pixel begins with establishing essential Facebook assets. Ensure you have a Facebook Business Page, a Business Manager, and a Facebook Ad Account. If you’re yet to develop these components, follow Facebook’s guidelines for creating them.
Access Facebook Ads Manager
To initiate the Meta Pixel installation, navigate to Facebook Ads Manager. Open your browser and enter “business.facebook.com/adsmanager” to access your Ads Manager account. This is where you’ll manage and configure your Pixel.
Create Your Meta Pixel
Inside the Facebook Ads Manager, under the “Events Manager” section, you can create and manage your Meta Pixels.
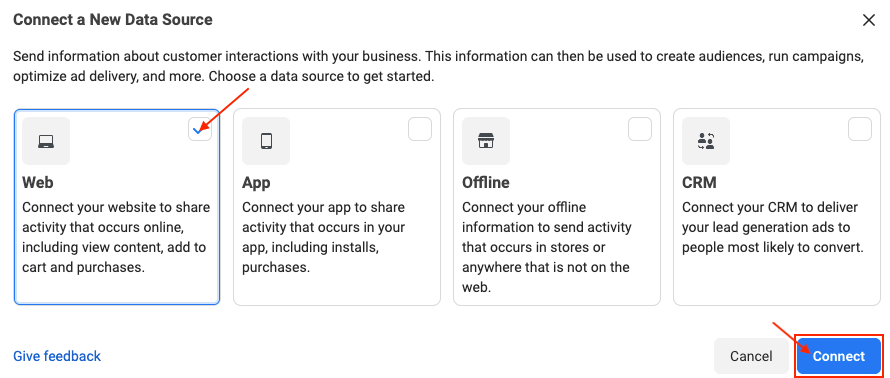
Click on “Connect data sources” and select “Web.” Assign a name to your new Pixel, keeping it relevant to your Shopify store.
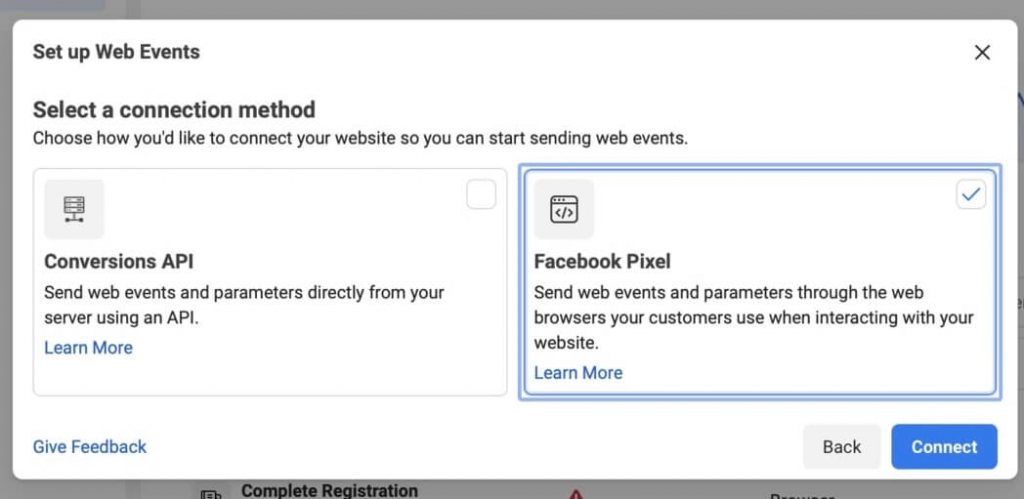
Enter your store’s URL accurately, and opt for “Conversions API and Meta pixel” to gather comprehensive data.
For the simplest integration, choose “Set up with partner integration” and select Shopify as your partner.
Navigate to Your Shopify Store
Return to your Shopify admin panel.
Hover over “Sales channels” on the left sidebar, click on “Online Store,” and select “Preferences” from the provided options.
Scroll down until you find the “Facebook Pixel” section, then click “Set up Facebook.”
Connect Facebook to Shopify
Under “Set up Facebook Marketing,” click “Connect account.” Ensure that your personal Facebook account is selected, which should also be associated with Facebook Business Manager.
Choose your Business Manager and proceed to verify your primary domain. Add the ad account you used to create the Meta Pixel and accept the terms for “Custom Audience Terms” and “Facebook Business Tools Terms.”
Under “Data sharing,” you can select either “enhanced” or “maximum.” Confirm that the correct Meta Pixel is selected for tracking behavior.
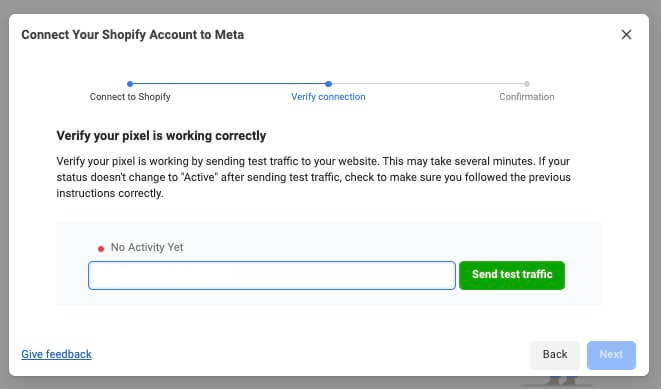
Verify and Test Your Meta Pixel
Return to your Facebook account and access Events Manager. Check the box indicating that you’ve completed the setup on Shopify and proceed. Verify that your Meta Pixel is active by checking its status. To ensure that all events on your Shopify store are being tracked accurately, use the “Test events in Events Manager” function. This step is crucial for ensuring the proper functioning of your Meta Pixel.
Monitor and Optimize
Now that your Meta Pixel is successfully integrated, you can begin to monitor and optimize your e-commerce efforts. It lets you track visitor behavior, record conversions, and create custom audiences. The valuable data you gather will empower you to fine-tune your ad targeting, improve the performance of your Facebook advertising campaigns, and unlock the full potential of your Shopify store.
With these steps, you have successfully harnessed the power of Meta Pixel, turning your Shopify store into a data-driven marketing engine. By consistently optimizing your campaigns and tailoring your marketing efforts to customer behaviors, you’ll be better equipped to meet the demands of today’s dynamic e-commerce landscape.
Customizing Pixel Events for Better Conversions
Regarding improving your Shopify store’s performance, Facebook Pixel plays a pivotal role. By customizing Pixel events, you can enhance your conversion tracking, allowing you to optimize your advertising campaigns for better results. We’ll explore the importance of customizing Pixel events and provide step-by-step instructions on how to do it effectively.
Why Customize Pixel Events?
Pixel events are predefined actions that Facebook Pixel tracks on your website, such as page views, add to cart and purchases. Customizing these events allows you to gain more insights into user behavior and tailor your ad campaigns to specific objectives. Here’s how to get started:
Step 1: Access Facebook Events Manager
- Log in to your Facebook Business Manager account;
- Click on the Business Manager drop-down menu and select Events Manager. This is where you manage your Pixel events.
Step 2: Choose the Pixel to Customize
- In the Events Manager, click on your Pixel from the list of available Pixels. If you haven’t created a Pixel for your Shopify store, follow the steps to set it up.
Step 3: Customize Events
- In the Pixel Overview section, click on “Aggregated Event Measurement.”
- Here, you’ll find the default events that Facebook Pixel tracks. To customize them, click “Configure Web Events.”
Step 4: Add Custom Conversions
- In the “Configure Web Events” section, you can add custom conversions based on your specific goals. For instance, if you want to track users who view a particular product category page, click “Custom Conversions” and then “Create Custom Conversion.”
- Name your custom conversion (e.g., “VIewed Product Category A”).
- Set up the event parameters, such as the URL and conditions for the event. This could be a specific product category page or a URL containing particular keywords.
- Click “Create” to save your custom conversion.
Step 5: Review and Confirm
- Once you’ve added custom conversions, review the channels and click “Submit” to save your customized events.
Step 6: Update Your Shopify Store
- After customizing your Pixel events in Facebook Events Manager, you must update your Shopify store to include the new events. This typically involves editing the code on your store to match the events you’ve created.
- To do this, access your Shopify admin panel;
- In the admin panel, go to “Online Store” and click “Themes.”
- In the current theme section, click “Actions” and then “Edit Code.”
- In the same code editor, find the section that corresponds to the Pixel code.
- Update the code to include your custom conversions. Follow Facebook’s guidelines for adding custom events to the Pixel code.
- Save your channels and ensure the Pixel code works correctly by using Facebook’s testing tools.
Step 7: Optimize Your Ad Campaigns
- With your custom events in place and accurately tracked by Facebook Pixel, you can use this data to optimize your ad campaigns.
- In Facebook Ads Manager, create custom audiences based on the specific events you’ve customized. For instance, you can create an audience of users who viewed a particular product category or added items to their cart but didn’t complete a purchase.
- Tailor your ad content and targeting to these custom audiences for more effective ad campaigns
Customizing Pixel events empowers you to track and optimize user interactions on your Shopify store with precision. By fine-tuning these events, you can gain deeper insights into your customers’ behavior and create more targeted, effective advertising campaigns for better conversions.
Enhance Facebook Pixel Setup with Data Sharing Settings
Improving the setup of your Facebook Pixel on Shopify is crucial for gaining valuable insights into your e-commerce website’s performance and user behavior. One of the key aspects to enhance your Facebook Pixel setup is configuring the data-sharing settings. By doing this, you can optimize your ad campaigns, boost conversions, and gain a deeper understanding of your audience. In this guide, we’ll explain the importance of data-sharing settings and how to leverage them effectively for your Shopify store.
Understanding Data Sharing Settings
Data Sharing Settings refer to the options that allow you to control and customize the data shared between your Shopify store and Facebook. Proper configuration of these settings ensures that the correct information is transmitted, and you can harness this data to your advantage. Here’s how to enhance your Facebook Pixel setup with Data Sharing Settings:
Step 1: Access Facebook Events Manager
- Begin by logging into your Facebook Business Manager account
- In the Business Manager, click on Business Manager and select Events Manager to access the management dashboard for your Facebook Pixel
Step 2: Select Your Pixel
- In the Events Manager, you’ll find a list of your Pixels. Choose the Pixel associated with your Shopify store. If you haven’t created one, follow the steps to set it up.
Step 3: Configure Data Sharing Settings
- In the Pixel Overview section, locate and click “Data Sources” in the left-hand menu.
- Under “Data Sources”, select “Pixel.”
- In the Pixel section, you’ll find “Data Sharing Settings”. Click on it to configure your settings.
Step 3: Configure Data Sharing Settings
- In the Pixel Overview section, locate and click on Data Sources in the left-hand menu.
- Under Data Sources, select “Pixel”
- In the Pixel section, you’ll find “Data Sharing Settings”. Click on it to configure your settings.
Step 4: Adjust Data Sharing Preferences
- In the Data Sharing Settings menu, you’ll have several options for customizing your data-sharing preferences. These options include “Standard, “Enhanced,” and “Maximum.”
- Choose the setting that aligns with your business objectives and privacy considerations. Remember that selecting “Enhanced” or “Maximum” can lead to more effective ad campaigns, as Facebook has more data to work with.
Step 5: Save and Confirm
- Once you’ve adjusted your Data Sharing Settings, review your choices and ensure they match your marketing strategy and objectives.
- Click “Save” to confirm the changes you’ve made.
Step 6: Monitor Performance
- After configuring your Data Sharing Settings, it’s essential to monitor your ad campaigns and Pixel performance. You can do this within Facebook Ads Manager.
- Track conversions, ad engagement, and the effectiveness of your ad campaigns to gauge the impact of your enhanced Pixel setup.
By fine-tuning your Data Sharing Settings, you’re equipping Facebook Pixel to provide you with more precise insights into your Shopify store’s performance. This enhanced data sharing can lead to more targeted ad campaigns, improved ad performance, and a deeper understanding of your audience.
Conclusion
Mastering the art of integrating the Facebook Pixel on Shopify is a pivotal step for Shopify store owners. This comprehensive Facebook Pixel Shopify tutorial has unraveled the intricate transition from the formerly known Facebook Pixel to the enhanced Meta Pixel. Understanding the meta code and its functions and leveraging its capabilities can lead to profound insights into your Facebook users’ behaviors.
From creating and installing the Pixel to optimizing its performance, Shopify store owners now possess the tools to elevate their online businesses. The power of Facebook (Meta) Pixel enables accurate conversion tracking, robust ad targeting, and data-driven decision-making.
However, it’s essential to monitor potential pitfalls, such as incorrect data and the impact of ad blockers. Careful consideration of data sharing settings and using the Meta Pixel code is essential in enhancing ad performance and unlocking a deeper understanding of your website visitors.
This journey of installing and fine-tuning the Facebook (Meta) Pixel to Shopify will undoubtedly open doors to a world of possibilities. By seamlessly integrating your Shopify account with apps and sales channels, you’ll harness the full potential of this powerful tool. With the right strategies, your Shopify store can transform into a conversion-driven powerhouse, and your Meta Pixel will be the compass guiding the way. So, what are you waiting for? It’s time to harness the power of Meta Pixel for a brighter future for your Shopify business.

A PPC specialist who started with organic social media. For several years, the core of his activities are:- Google Ads, Microsoft Ads, Meta Ads, TikTok Ads, Twitter Ads, Linkedin Ads. He has led campaigns with a global reach, e.g. for FootballTeam, G2A, ETOTO, as well as many smaller campaigns in the sports, construction and financial industries. Has full focus on ROAS. Privately, a fan of football, history of wars and Star Wars.