Facebook Ads is one of the most famous platforms for paid digital marketing. But to achieve good results with your campaigns, it is indispensable to have a tool that gathers the results automatically and provides insights into what to do next.
This is where Meta Pixel can be a game-changer in the industry. The tool provided by Facebook’s company was recently released and can help numerous business owners effectively plan their campaigns based on the results gathered.
Whether you create campaigns to gather more traffic to your web page or to generate more sales, the Pixel tool can provide you with everything you need to increase your ads performance and reach these objectives.
If you don’t know what this tool is or how to set it up, this article is perfect for you. We will show you how to set up your own Meta Pixel tool. Make sure to follow all steps carefully to ensure everything is working perfectly.
What Is Meta Pixel
Meta Pixel (also called Facebook Pixel) is a solution from Meta that allows business owners to efficiently gather data related to their ad campaigns on Facebook and other platforms from the company. The main objective of this tool is to monitor users and their actions on your website to collect information and generate insights on their behavior.
With the data generated from the Pixel code, the user can easily track how optimized their ads are and if they are reaching the right audience. It is not meant to track your ad itself but what people do after clicking on them. This way, you can use the Meta Pixel code not only to create better ads but also better websites, landing pages, and profiles.
The Facebook Pixel code is also fully customizable, allowing it to provide features like maps of your audience and even automatic advanced matching tools. Everything will depend on how you integrate it into your website and the Pixel setup you create.
What Meta Pixel Can Do
As you can see, Pixel is a highly versatile tool and goes far beyond just measuring an ad’s performance. What it does and how the data is organized will depend on your Pixel base code.
The possibilities are almost endless. Some of the most common uses for this powerful tool are:
- Track the number of visits to your web page
- How many users added a specific product to their carts
- How many users completed a purchase
- Average time spent on each of your web pages
- Average amount spent on each purchase
There are several other possibilities of usage for Facebook Pixel. The best ones will depend on the business you have and the type of information you want to gather. Each one will require different permissions and setting processes.
How Meta Pixel Gathers Data
Facebook Pixel is far from being magic and works through a pretty straightforward process. Pixel attaches a code to your website that allows it to track specified events that happen.
For example, if you create ads based on products and want to track how many users added them to their carts, you can create a pixel code that detects every time this action happens. This way, you can easily have a metric in this action without manual counting.
Facebook Pixel mainly gathers its information by controlling cookies with browser settings. You know those cookies the website always offers users every time they enter a website? Those cookies are also “traces” of your steps on the website and what you do.
This way, Pixel can gather all the data sources it needs to create an accurate profile of how much time was spent on each tab and which products were most sold. It is important to know that some browsers offer options to block these cookies. In these cases, Meta Pixel won’t be able to gather information on these users, so make sure to always consider this when analyzing the metrics gathered.
How Facebook Pixel Integrates With Your Ad
Collecting this kind of data is not standard for ads in Meta platforms, and you have to install Facebook Pixel to get these features. To integrate the Facebook conversion tracking tool into your web platform, there is a process that should be followed.
Once Pixel is installed, it will gradually integrate with your ad and optimize it. Here is how it happens:
Pixel Installation
The first thing that happens is that the users install a pixel (tracking code) in their website structure. This will allow you to “connect” Facebook on this browser and collect the necessary cookies for gathering information.
Insight Generation
Through cookies and similar technologies, Pixel will start generating insights about the data gathered after you integrate it into your website. These insights include where the users are coming from and many other valuable pieces of data. The insights are not only about the devices being used but also about the demographics of each user.
User Behavior
After collecting information on demographics and access conditions, Pixel will also start evaluating the behaviors of each user on a specific page or throughout your website. Through the ads manager, you can also click settings and adjust what kind of behavior you want the tool to keep track of.
User behavior also includes their shopping habits, like which items they added to their shopping carts and what type of product they most look after on your website. You can have total control over the optional behavior tracking tools, gathering only the information that matters to your business.
Audience Creation
Once Facebook Pixel gathers data regarding device usage and behavior, you can create larger custom audiences to show your ads to. Meta Pixel offers advanced tools to understand who your real audience is and how you can better reach them when creating your marketing campaigns.
With the customer data, you can also create personalized lookalike audiences that might be a good idea to invest your marketing efforts in as well. Thanks to all the Pixel data gathered, it becomes way more accessible to market to the right audience and choose the right media type.
Optimize Bidding
Once the previous steps are concluded, the Pixel tool can start optimizing your bidding strategies and take advantage of the created custom audiences to reach a lower CPC.
By learning about your audience and their habits, Pixel can provide numerous solutions to reach better results in your campaigns based on what your customers want to see and are more likely to click through.
How to Set Up Your Meta Pixel Code
Now, it’s time to see the steps necessary to set up your own Facebook Pixel integration. Make sure to follow each step carefully. This way, you avoid problems with the Facebook Pixel ID and any other process part.
Here are the main steps for setting up Facebook Pixel:
Log Into Your Facebook Business Suite
If you want to select Facebook Pixel to run on your website, you must have an account on the Facebook Business platform. If you don’t have one, make sure to create one before starting your campaign.
Creating this account is the first step to any paid marketing action on Facebook or any other platform from Meta. Once you’re logged in, you can start the Pixel setup.
Click on the “All Tools” Button
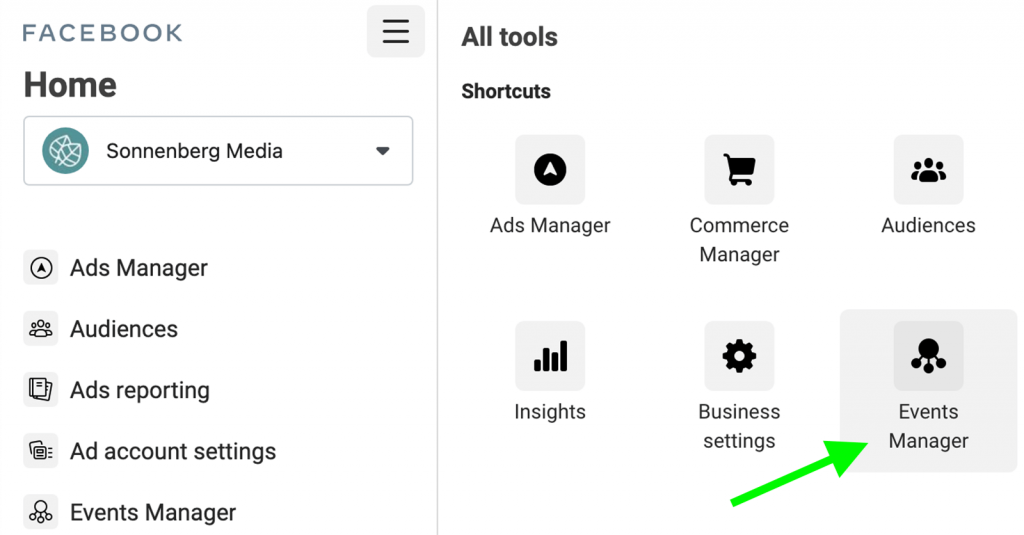
On Meta’s main screen, you can easily find a three-stripe icon at the top of the screen that pops up a window showing all the tools you can use for your Facebook company page. By clicking on it, you’ll find a button called “Facebook Events Manager,” where we find the option to create dynamic ads and set up data-collecting tools.
Click Connect Data and Add a Source
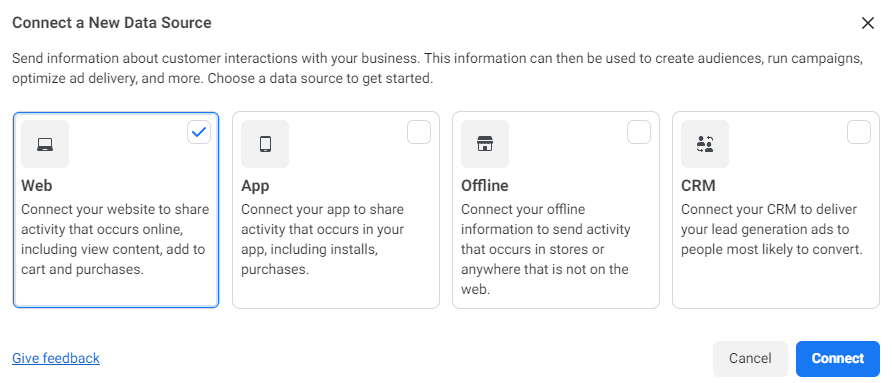
Next, you’ll find an option to connect data to your Facebook campaign, which will require a source for collecting the necessary information. If you want to connect it with a website URL, you only need to select a website.
You can also connect it to an app to keep track of different usage metrics. It is a great option if you have a dedicated app for selling products or hiring services.
It is essential to understand that you can have more than one Pixel, so if you want, you can select Meta Pixel on both the website and app separately.
Select Pixel
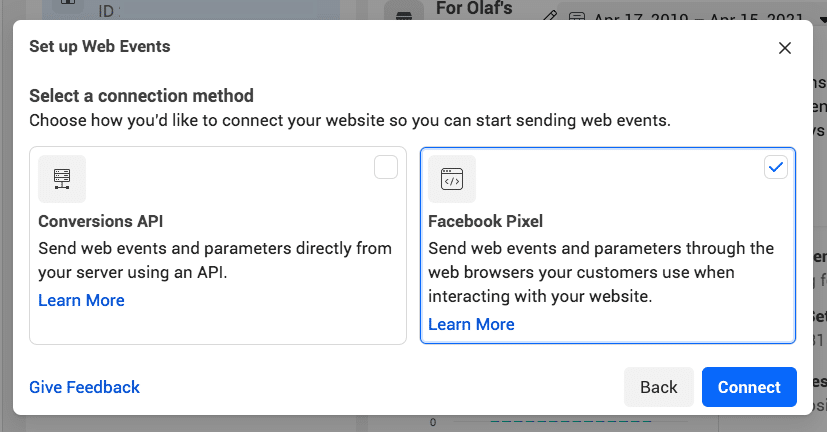
After doing that, you’ll find an option to add Meta Pixel to your website or app. Once you click on the option, you’ll have to create a name for your Pixel. It is indispensable to create an easily identifiable name for your tool.
Since you can have multiple Pixels, having a way to tell each one apart is indispensable. Otherwise, it could get confusing and generate problems not only in the platform but also for your added elements, like maps and videos.
Paste Your Website URL and Start the Pixel Installation
Next, you just need to paste your website URL into the platform and select one of the options for integrating and installing the tool. There are two main ways of doing this task, and a person must do it with coding knowledge (especially Javascript code) since it requires technical actions that, if not done by a professional, can lead to errors and problems with your website.
Here are the two main ways to install Pixel:
Partner Integration
The easiest and best way is through partner integration, but only some websites support this option. As the name suggests, it is dedicated to websites that partner with Meta and have automatic ways of doing this installation.
Facebook Pixel changed a lot with time and constantly adds new partners to the program, so it likely supports yours. But if it’s not the case, don’t worry. There are other ways of doing it.
Some of the partners that allow you to automatically install the Event setup tool are:
- WordPress
- Wix
- Shopify
These are the main ones, but there are many others. You can check the full list on their website.
Install Code Manually
If you don’t have the automatic integration from the partnership program, you’ll likely have to manually install the code on your website’s structure. For this procedure, Meta offers a complete guide on how to do it and includes the base documentation for you to read and better understand the Pixel code structure.
If doing this process, hire someone with experience in JavaScript. Even though you can open event setup tool tutorials and watch the videos provided by Meta, it is a technical procedure that can lead to numerous problems if done incorrectly.
Two good ways of doing this are by contacting the developer who built your website or hiring a third-party developer to help you insert the code directly into your website.
Where the Code Is Inserted
Meta Pixel is a code inserted in the header of your website code. It comprises two main parts: The base code and the Pixel events tags.
The first is the basic structure that allows the tool to work correctly on the linked website. The events part is responsible for tracking information about online advertising based on what you programmed the tool for. Remember that, to collect the information, the user visiting your website must accept cookies from other companies. If they decline optional cookies, it is not possible to track their behavior online. You can click here to check Meta’s official documentation for Pixel, along with a header template of how your code should look like.
Test It
Lastly, you need to check if Meta Pixel is working on your website. One of the easiest ways to do it is through Meta Pixel’s official Chrome extension.
Downloading it allows you to open the URL and verify if it matches the one registered in your Meta Business platform. Once you confirm everything is running correctly, you can start to track conversions and use these cookies to generate relevant data to provide and improve Meta.
Common Pixel Events and Their Codes
If you plan on manually adding your events to your website code, here are some suggestions. These are the most commonly featured event trackers of Facebook Pixel, along with their standard code.
Make sure to analyze your business to understand which ones can help you generate valuable data and how. Here is the list:
- Add to cart – fbq(‘track’, ‘AddToCart’);
- Purchase Completion – fbq(‘track’, ‘Purchase’, {value: 0.00, currency: ‘USD’});
- Trial Period Start – fbq(‘track’, ‘StartTrial’, {value: ‘0.00’, currency: ‘USD’, predicted_ltv: ‘0.00’});
- Start of a Paid Subscription – fbq(‘track’, ‘Subscribe’, {value: ‘0.00’, currency: ‘USD’, predicted_ltv: ‘0.00’});
- Checkout Process Start – fbq(‘track’, ‘InitiateCheckout’);
Why Hiring a Professional Agency for Your Meta Pixel Website

Facebook Pixel is an excellent solution for keeping track of all aspects of your marketing campaigns and better telling how to improve your results. However, creating these campaigns is not something you learn from one day to another, and if not done by professionals, it can cause numerous problems.
That’s why hiring a professional company becomes vital when running a campaign of this kind. Whether to create a simple background image or to include the numerous features this solution provides to any business, everything needs to be correctly coded and featured on the website.
At GamerSEO, we have the best professionals on the market with years of experience. We offer various services that go from simple keyword research to complete Meta Pixel campaign planning.
By joining us, you ensure total support in every aspect of your marketing efforts, from the beginning to the end. Let’s create quality marketing together.
Time to Start Setting Up Your Meta Pixel
Meta Pixel is one of the best solutions for better controlling your website and understanding what your users do when accessing its different pages. From device information to which items are the most sought-after, this powerful tool can be a game changer that shows you everything you need to create the best campaign possible.
But setting up Pixel can be way more complex than most people think, especially when it comes to the coding part. If not done by an experienced person, it can lead to problems with the tool and your website.
Now that you know everything you need, it is time to start setting up the tool on your website. Follow all the steps carefully, and you’ll see all the possibilities it can have not only for your website but for your marketing campaigns as well.

A PPC specialist who started with organic social media. For several years, the core of his activities are:- Google Ads, Microsoft Ads, Meta Ads, TikTok Ads, Twitter Ads, Linkedin Ads. He has led campaigns with a global reach, e.g. for FootballTeam, G2A, ETOTO, as well as many smaller campaigns in the sports, construction and financial industries. Has full focus on ROAS. Privately, a fan of football, history of wars and Star Wars.