WordPress is a major platform where people around the world can build their websites and publish them easily by using its plugins and tools. One of the strongest aspects of WordPress is that it allows you to link it to a series of services and external platforms to improve results and provide your website with a more professional look. One of these external services is Meta Pixel, a Javascript code part of Facebook Ads Manager.
Despite this possible vinculation between both platforms, many people don’t know How to Add Meta Pixel Code in WordPress. You can find the answer to this concern in the subsequent paragraphs. We will teach you how to link Meta Pixel and WordPress in two different ways and remark on the importance of implementing the “Code” way. Let’s go straight to this topic!
What Is Meta Pixel?
Formerly known as Facebook Pixel, Meta Pixel is a virtual software or piece of Javascript and a powerful designed to measure if your campaign has reached the marketing objective. It evaluates the performance of your Facebook Ads campaign by measuring and monitoring the website actions that users take on your page. Meta is also crucial to know if you’re showing your ads to the right audience. Meta Pixel tracks events based on the following parameters:
- Page views.
- Add to cart.
- Purchase.
- Click-through Rate.
- Scroll Depth.
- Time on Page.
Meta Pixel also allows you to constrict your audience and get better results with less spending. Thanks to Meta Pixel, you can showcase your advertisements to people who’ve shown interest in your website.
When you install a Facebook Pixel ID on your WordPress website, you will be able to measure different actions that visitors take, such as completing conversions and how many pages they visit within your website. Installing Facebook Pixel on WordPress also allows you to optimize your Facebook and Instagram ad campaigns.
What Are the Advantages of Adding Facebook Pixel to WordPress?
Since WordPress allows you to create websites from scratch or using a pre-built template among the hundreds you can find on the platform, you can implement advertising as a result of the link between Meta Pixel and WordPress. In other words, you can monetize your sites or publish your Facebook ads to increase brand awareness or promote your products.
Besides, linking Meta Pixel and Events Manager to your WordPress account means running Facebook Ads on your website, which brings all the benefits to your business and conversions.
How to Add Facebook Pixel to WordPress?
There are two main ways of adding Meta Pixel to WordPress. Next, we mention both to make sure you do it in the way that best suits you.
- Create a New Facebook Pixel
You can do it in a couple of clicks via Facebook Business Suite Events Manager.
The first you need to do is log in to your Facebook personal account. Then, head to Facebook Ads Manager. Once there, position your mouse in the menu located on the left of the screen and select “All tools.” Then select “Events Manager.”
The system will prompt you to connect your data. Click “Connect Data Sources.” A new window will appear, offering four main alternatives of sources. Select “Web” and click the “Connect” button.
After clicking the “Connect” button, a “Create Pixel” window will pop up on the screen. The next step is to name your pixel. We suggest you use a name that you can easily remember. Finally, click the “Create Pixel” button. Check the image below.
Now, a new window prompting you to enter your website URL will appear. Enter the URL of your website. This way, Facebook Ads Manager and Meta Pixel will let you know if you can connect your data utilizing a pattern, such as WordPress, Shopify, or WooCommerce. Click “Check.”
If you can connect to the website, a green check mark will indicate this is possible. The image below shows clearly what you’ll see in this step. Click “Next.”
The following step is to select the proper method to find a setup. By default, the system will recommend you use the “Get guidance” option. We think the same. Then, select this option and click the “Next” button.
The next step is to select the people who will be in charge of connecting your data. Are you working alone on your project? Are there other people working on your marketing strategy and using Google Analytics and other tools to track performance? Select the option that better fits your situation. Click the “Next” button.
At this point, the Events Manager will prompt you to select your technical knowledge and expertise or if you have developer resources available. Select the option that is closer to your reality, or skip this step. Then click the “Next” button.
In the subsequent steps, you can define how much you want to budget for advertising on Meta and indicate your cloud provider. You can indicate Amazon Web Services as your cloud provider or indicate any other option.
The system will recommend you set up Conversions API alongside Meta Pixel through a series of methods and partners. Click the “Get Started” button, and then select the WordPress choice.
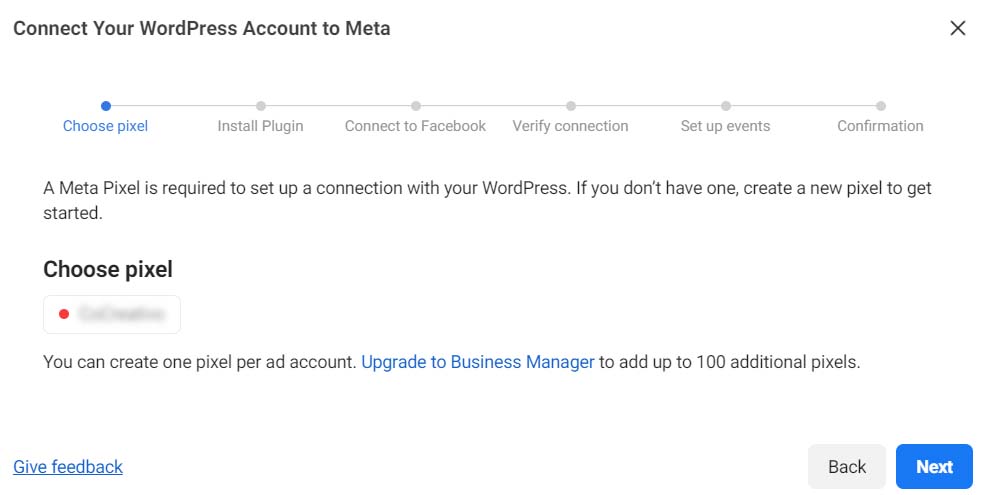
From this point, the system will guide you through a very easy-to-understand process whose goal is to connect your WordPress account to Meta. The events Manager will select your Pixel by default and then will let you know what steps you need to complete on the WordPress dashboard to connect the account.
The next step would be to log into your WordPress account and look for the “Facebook for WordPress” plugin, install it, and activate it. This process will link your WordPress account to Facebook. The image below shows you how the Facebook for WordPress plugin should look.
Then, you should select “Settings” within WordPress and choose Facebook from the dropdown menu. Click “Get Started” and follow the instructions. At this point, the system will verify that your Facebook Pixel is working. To do this, it will use the Facebook Pixel Helper Extension. This process can take several minutes. After this, you can set up events and confirm the connection.
Still, there is a problem with this option. This official Facebook plugin has some issues, a lot of bugs, and does not work properly. Due to this, we recommend you use an external plugin that will facilitate the process of connecting WordPress to Meta Pixel.
This free plugin is PixelYourSite.
Completing this process involves you getting your Meta Pixel ID located in your Facebook ad account. With Pixel installed in your Facebook Ads Manager, it should be very easy to locate your Meta Pixel ID.
So, you want to know How to Add Meta Pixel Code in WordPress, right? With your Meta Pixel created, you can install code manually on WordPress. Let’s check how you can complete this process.
- Add Facebook Pixel ID to PixelYourSite Plugin
To do this, you need to insert the Facebook pixel code before the </head> in your WordPress theme.
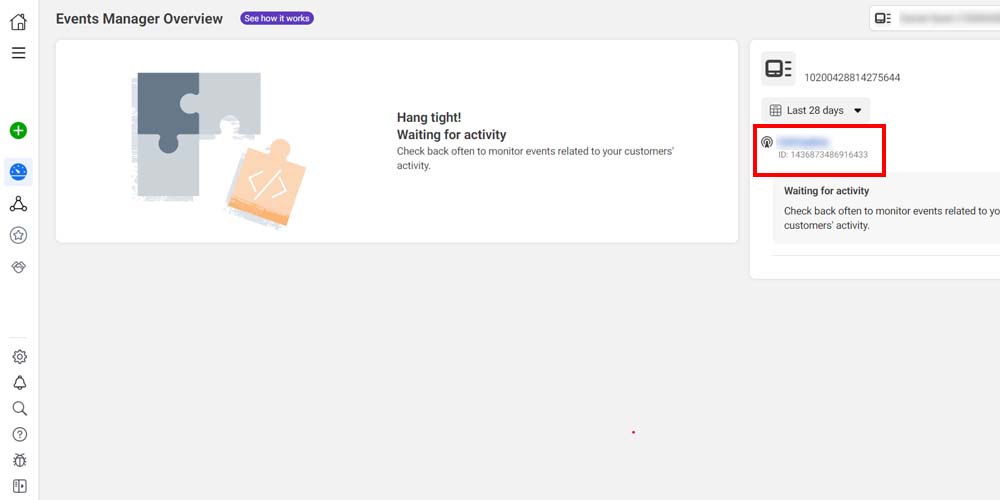
But where can you get your Meta Pixel code? You need to return to Facebook Events Manager. When you enter the Events Manager Overview, you can see your Facebook Pixels (because maybe you have more than one) on the right side of the screen. Look for the Pixel you’re interested in. Below its name, the Pixel ID should appear. This situation is indicated in the image below.
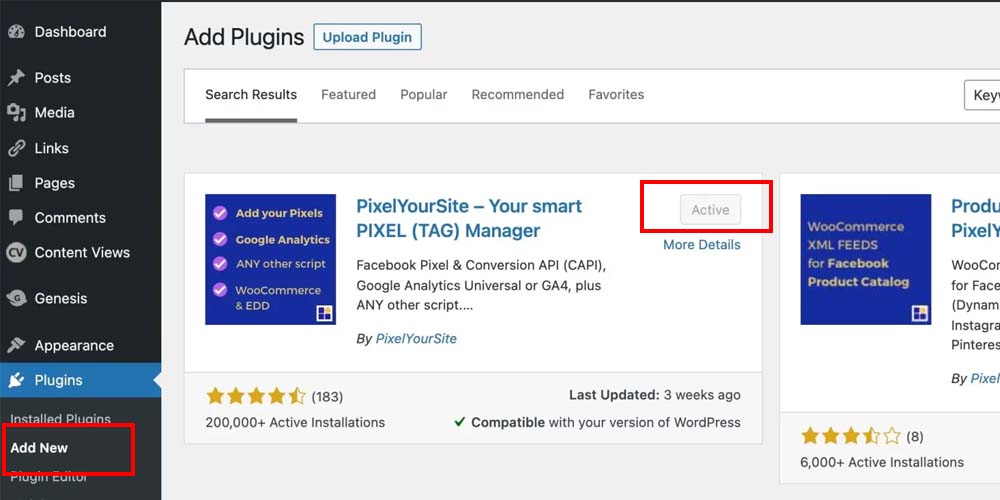
Now you know what your Facebook Pixel ID is, you must return to WordPress and log into your account. Head to the “Plugins” category located in the left column, select it, and then click “Add New.” Next, follow these instructions:
- Type PixelYourSite in the search box and look for the plugin. It will probably appear first on the list.
- Install the plugin and then click “Activate Now.”
But that is not all! Now, you need to configure the plugin to link your WordPress website with your Facebook Pixel events. To do this, complete the following steps.
- Look for the “PixelYourSite” plugin on the left menu and click “Dashboard.”
- Click the “Click the Settings” button.
Now it’s when you need to copy the Meta Pixel ID you found in the Events Manager. Enter the ID in the “Facebook Pixel ID” box. Check the image below.
Now, the only thing you have to do is save the changes. Scroll down the page until you find the respective button, and click it.
And that’s it! You have installed the Meta Pixel Code in WordPress manually! This method is the most recommended way of doing this. Now, you can run Facebook ad campaigns on your WordPress website without problems.
An Alternative Way of Installing Meta Pixel Code in WordPress
There is a simpler way of linking WordPress to Meta Pixel, although it can be a bit confusing for some users. This method uses a plugin called “Insert Headers and Footers.” To run this method, you first need to head your Pixel in the Events Manager.
- Access the Integration Code Snippet
To access the integration code snippet, click the Manage Integrations button located below the Pixel ID you’ll use to link your WordPress.
In the window that spawns, click the “Install Code Manually.” This action will display the tracking code that you’ll use after in the <head> section of WordPress.
Keep the window open because you will need the code in the next step to add a Facebook Pixel to WordPress.
- Add the Facebook Pixel Tracking Code to the WordPress <head> Section
Enter WordPress and head to the plugins tab. Now, complete the following steps:
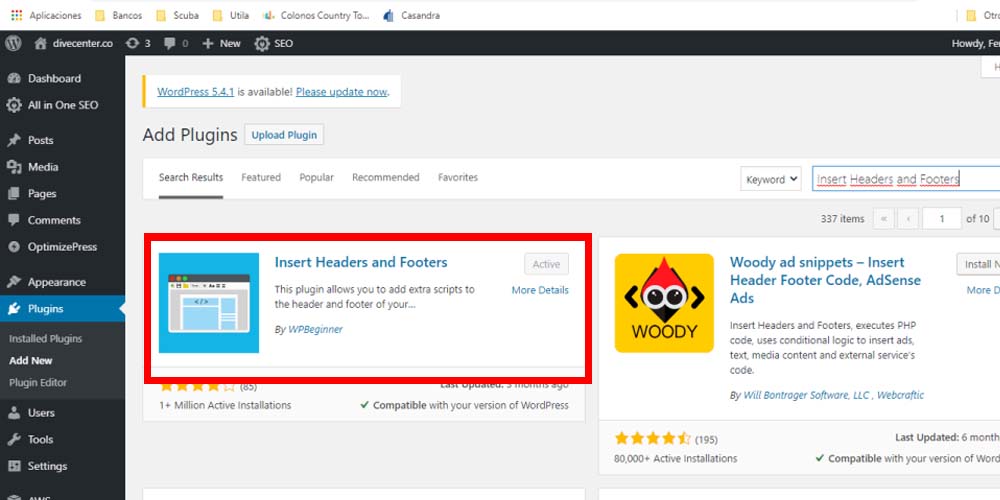
- Look for the free Insert Headers and Footers plugin.
- Install and activate the plugin.
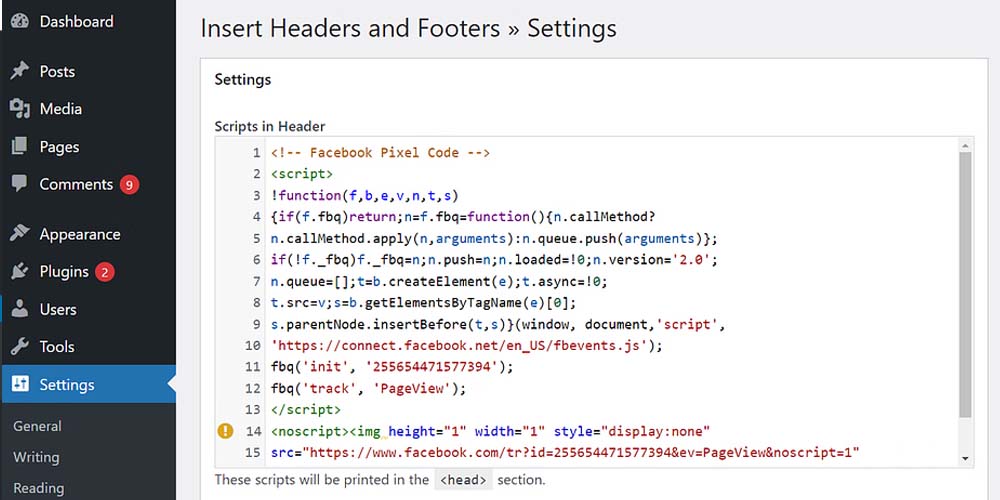
- Head to Settings > Insert Headers and Footers.
- Once there, copy and paste the Base Code you found in the Manage Integrations sections with the Pixel. What you see should look like the image below.
Now, you’ve successfully added Meta Pixel to WordPress, and you can start to deploy your social media ads on your WordPress websites.
Still, we want to give you some important tips you should adopt to improve your campaigns by using Meta Pixel.
- Configure Automatic Advanced Matching and Events
Now you know how to add the Facebook Pixel, we teach you how to configure advanced matching for better targeting.
- The first step is to head to your Pixel.
- Click the Data Sources tab located in the left menu.
- Select the Pixel you’re interested in using.
- Click the “Setting” tab.
- Scroll down the mouse until you see the “Turn on automatic advanced matching” section.
- Click the toggle On.
- Click “Show customer information parameters.”
- Toggle On the parameters you wish to share from the WordPress website. The crucial ones you should toggle on are email and phone number.
Once you’ve finished the process through which you configure Facebook Pixel and automatic advanced matching, the changes should take up to 48 hours to appear in the Meta Events Manager.
- Create Custom Audiences Using Facebook Pixel
At this point in the process, you’ve successfully installed Meta Pixel on your WordPress site. Now, it’s time to create a custom audience to target potential customers better.
- Head to the Meta Business Suite dashboard.
- Click the “All Tool” tab located on the left menu.
- Click the “Audiences” section.
- On the next window, click the “Create Custom Audiences” button.
A new window will open. In this new window, you need to select the source from where you will extract the audience information. You can select from “Customer list,” “Website,” “App Activity,” and more. We recommend you select the Website option.
- Finally, you need to select the proper choice among “All web visitors,” “People who visit specific pages,” or “Visitors by time spent.”
- Lastly, you must choose the number of days of the campaign.
- Click “Create audience.”
The Bottom Line
Creating a Meta Pixel from your Facebook Ads account and linking it to WordPress is easy if you know exactly where to find the code snippets and which plugins to use. This bonding will allow you to create and expand Facebook Advertising campaigns to your WordPress sites and reach a wider range of audiences. Besides, this action also allows you to track visitors and conversions emanating from your particular page.
Still, for a better performance of ads on your WordPress site and a better usage of the Pixel page, do not hesitate to send us a message through our contact form. GamerSEO, as a professional marketing agency, will help you to create the best marketing campaigns through the Facebook Business Manager and other relevant tools!

A PPC specialist who started with organic social media. For several years, the core of his activities are:- Google Ads, Microsoft Ads, Meta Ads, TikTok Ads, Twitter Ads, Linkedin Ads. He has led campaigns with a global reach, e.g. for FootballTeam, G2A, ETOTO, as well as many smaller campaigns in the sports, construction and financial industries. Has full focus on ROAS. Privately, a fan of football, history of wars and Star Wars.